Turn your footage into 8mm film!
In the realm of visual storytelling, the allure of vintage film formats endures, with 8 mm and Super 8 standing as iconic representatives of a bygone era. These compact films, once threaded through mechanical reels, capture moments with an intimate graininess that speaks to the artistry of analog recording.
In this article, we look to achieve a vintage Super 8 film look using Adobe After Effects and find some handy free film overlays. But first, let’s quickly recap on the 8 mm film types.
8 mm Film:
Overview: 8 mm film is a motion picture film format that is 8 millimeters wide. It was introduced by Eastman Kodak in 1932 as a more affordable and accessible alternative to expensive 16 mm and 35 mm film.
Common Use: 8 mm film was popular for home movies and amateur filmmaking due to its compact size and ease of use.
Super 8 Film:
Overview: Super 8 was an improvement upon the 8 mm format, introduced in 1965. It retained the 8mm width but featured smaller perforations and a larger image area, resulting in better image quality.
Common Use: Super 8 gained popularity for amateur filmmaking and home movies. It was known for its ease of use and the ability to capture high-quality images with improved color reproduction.
Creating the Super 8 film style in After Effects
Creating a Super 8mm look in After Effects involves emulating the characteristics of Super 8 film, such as grain, color distortion, and vignetting. Here’s a step-by-step guide to achieve this effect:
Step 1: Import Footage
- Open After Effects and create a new composition.
- Import your footage by clicking on File > Import > File and selecting your video file.
Step 2: Apply Color Correction
- Once imported, select your footage layer.
- Add the Color Correction > Lumetri Color effect to flatten the colors. Do this by decreasing Highlights and Shadows values, under Basic Correction.
- Still within Lumetri Color, under Creative > Adjustments > Split Toning, pull the Shadow Tint towards the greens and the Highlight Tint toward the yellows.
Step 3: Add Film Grain
- From the title menu choose Layer > New > Adjustment Layer.
- Apply the Noise & Grain > Add Grain effect to this layer. Change the Viewing Mode to Final Output.
- Adjust the Tweaking > Intensity and Tweaking > Size until you achieve your desired look. You can also choose one of the film presets if desired.
Step 4: Apply a Vignette
- With the adjustment layer still selected choose Effect > Stylize > CC Vignette.
- Adjust the Amount value to darken the edges of your footage.
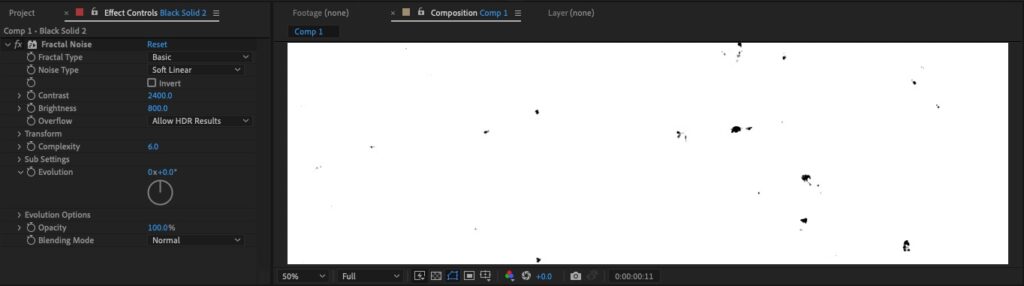
Step 5: Simulate Dust Marks
- Let’s create some dust marks. Add a Layer > New > Solid and apply the Effect > Noise & Grain > Fractal Noise effect.
Adjust the following noise settings to add dust spots:
Contrast: 2400
Brightness: 1000 - To animate the dust Alt + click (Option + click on Mac) on the stopwatch icon next to Transform > Offset Turbulence to open the expression editor, then add the following expression:
wiggle (30, 1000)- Change the Blending Mode of this layer to Multiply. Alternatively, for white dust, add a Channel > Invert effect and change the Blending Mode to Add.
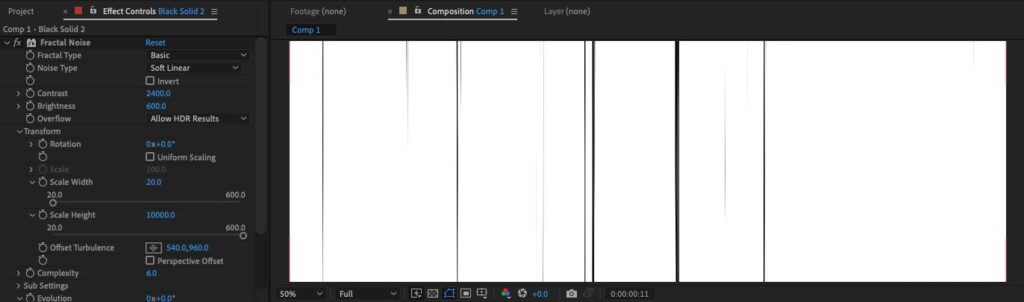
Step 6: Simulate Scratches
- Let’s create vertical film scratches by duplicating the solid you made for dust marks.
- On the new solid use the following Fractal Noise settings:
Contrast: 10000
Brightness: 3000 - Still in Fractal Noise, under Transform, uncheck Uniform Scaling and use the following scale values:
Scale Width: 10
Scale Height: 8000 - Add Effect > Transform and change the Scale Height to 10000.
- Change the Blending Mode of this layer to Multiply. Alternatively, for white scratches, add a Channel > Invert effect and change the Blending Mode to Add.
Step 7: Adjust the Frame Rate
- If your original footage has a high frame rate, consider reducing it to 18 or 24 fps to mimic the frame rate of Super 8 film. Right-click on your footage in the Timeline, choose Interpret Footage > Main and set the frame rate accordingly.
- Alternatively, add a new Adjustment Layer and use the effect Time > Posterize Time to lower the frame rate.
Step 8: Add a Film Frame Overlay (Optional)
You can add a rounded overlay box, in an aspect ratio similar to Super 8 film, as follows:
- Create a New > Solid and make this black.
- Unselect all layers.
- From the Toolbar select the Rounded Rectangle Tool then double-click this.
- Under Contents > Rectangle 1 > Rectangle Path 1 adjust the Size to 1200 x 990 with a Roundness of 60.
- Select the black solid layer underneath and change its Track Matte to Alpha Inverted Matte “Shape Layer 1”.
Need help? We have editable film frame templates ready to go! See below for details.
Step 9: Export
Once satisfied with the Super 8 look, export your composition by clicking on File > Export > Add to Render Queue.
By following these steps, you should be able to give your footage a convincing Super 8 look in After Effects. Feel free to adjust the settings and experiment with different effects to achieve the desired vintage aesthetic.
Video Tutorials
Prefer to watch how it’s done? Here are some select video tutorials showing how to create vintage film effects in After Effects.
Adding Film Frames
Want some authentic-looking film frame overlays to complete your vintage look?
View our film frame overlay templates for Premiere Pro | for After Effects
View our Vintage Film Overlay Kit