What is double exposure?
Double exposure is a photographic technique that involves exposing a single frame of film or digital sensor to multiple images. Traditionally achieved by taking two separate photographs on the same frame, this technique results in a merged image where the elements from both exposures coexist in a single frame.
This effect can be achieved easily through post-processing software, allowing photographers greater control and flexibility in creating surreal and dreamlike images.
What’s the double-exposure effect used for?
The double exposure style is versatile and can be employed for various artistic and expressive purposes. Here are some of its notable applications:
Artistic Expression: Double exposure allows artists and photographers to create visually striking and surreal images that go beyond the boundaries of traditional photography. It provides a unique way to blend two separate visual elements into a single frame, resulting in a composition that is often dreamlike, abstract, or emotionally evocative.
Narrative Complexity: This technique is effective in conveying intricate stories or layered narratives within a single image. By merging different scenes or subjects, photographers can communicate a more profound and complex message, prompting viewers to interpret and explore the visual story within the frame.
Symbolism and Metaphor: Double exposure enables the use of symbolism and metaphor by combining disparate elements to represent deeper meanings or concepts. The juxtaposition of images can create a metaphorical language within the photograph, allowing for a more nuanced and symbolic representation of ideas or emotions.
Emotional Impact: Double exposure can amplify the emotional impact of an image by blending different scenes or expressions. This technique can evoke a sense of nostalgia, mystery, or introspection, depending on the choice of elements and the overall composition.
Overall, the double-exposure style is good for pushing the boundaries of visual storytelling, creating unique and memorable images that leave a lasting impression on viewers.
How to achieve the double-exposure effect in Adobe Photoshop
Here’s a step-by-step, text guide to Chris’ video tutorial:
Step 1: Open Your Portrait Image
Begin by opening your chosen portrait image in Photoshop. Ideally, the image should have a clean solid color or white background. Click the link below for some free portrait images to experiment with.
Step 2: Separate the Subject from the Background
Use Channels to create a quick, clean selection to separate the subject from the background.
Alternatively, you can use your favorite selection method, such as the Magic Wand tool, and skip to Step 3.
- Find the channel with the most contrast and duplicate it by dragging it into the New icon.
- Go to Image > Adjustments > Levels and move the midtones and shadows sliders to the right to darken the image without expanding the black outline too much.
- Use the Brush tool with a black fill to paint over any remaining highlights in the center.
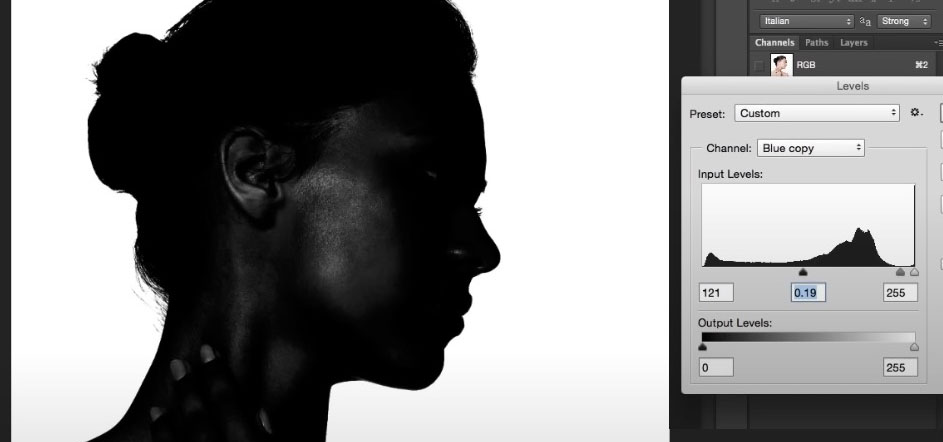
- Click on the RGB channel layer to return to normal.
- CMD+Click on the duplicated channel to load the selection, followed by Select > Inverse.
Step 3: Create the Clipped layer
- Return to the Layers panel and ensure the background is selected.
- Copy and paste the clipping onto a new layer.
- Fill the original background with white.
Step 4: Add a Background image
Find a nature or landscape image and paste it into the Photoshop document. Move it to the top of the layer stack.
Click the link below for some free landscape images to experiment with.
Step 5: Clip the Background image
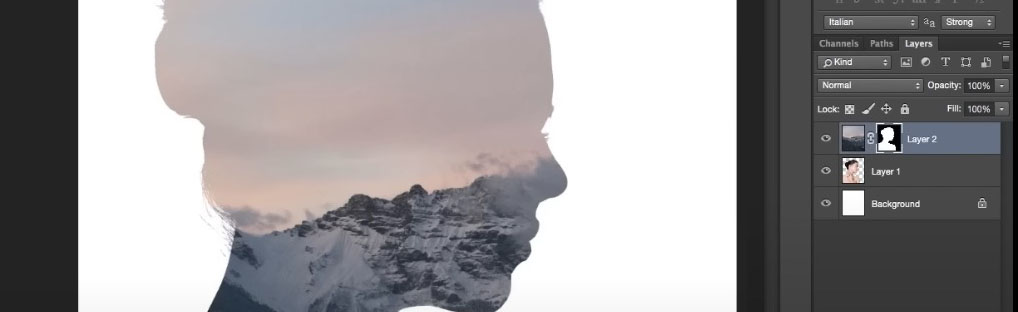
- CMD+Click the thumbnail of the portrait layer.
- Apply a Layer Mask to clip the landscape image.
- Un-link the mask with the layer by clicking the chain icon.
- Select the landscape layer thumbnail and go to Edit > Transform to scale and position the image independently for the best composition.
Step 6: Overlay the Portrait details
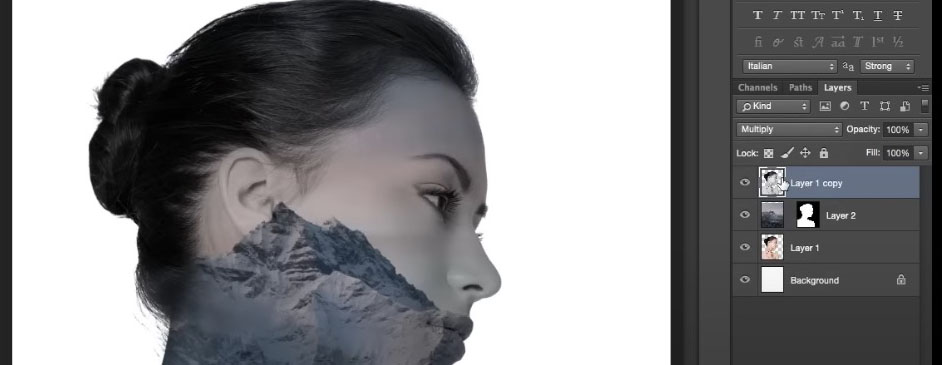
- Select the original portrait layer and press CMD+J to duplicate it.
- Move it to the top of the layer stack.
- Go to Image > Adjustments > Desaturate to transform it to black and white.
- Change the blending mode to Multiply.
- Apply a Layer Mask to this layer.
- Use a large soft brush with a black fill to erase around the edges of the portrait, leaving only the facial features.
- Reduce the opacity of the black and white portrait layer to around 70% to make the features subtly visible through the landscape.
Looking good!
By this stage you should now have a cool double-exposed image but we’ll further fine-tune the final look in the next steps.
Step 7: Adjust Surrounding Color
- Deselect the mask.
- Use the eyedropper to choose a color from the image.
- Adjust the color picker to brighten it.
- Fill the background layer with this color.
Step 8: Add a blurry Vignette

- Paste another copy of the landscape image from your clipboard.
- Move it to the top of the layer stack.
- Go to Filter > Blur > Gaussian Blur and adjust the radius to 250px.
- Apply a layer mask and erase away this layer, leaving a vignette-style effect around the edges.
- Reduce the opacity of this layer so the vignette is hardly visible but produces subtle changes in tone.
Step 9: Apply Final Color Correction
- Finish the effect by applying a Levels adjustment layer.
- Tweak the highlights and shadows to increase contrast and bring out the details of the image.
The final result is a cool blend of two images creating a surreal piece of art suitable for posters or album covers.
The advantage of using Photoshop is the ability to experiment with different images for the best mix.
The tutorial is complete, and you have successfully created a double exposure effect in Photoshop. Enjoy your artwork!
More double-exposure tutorials
Want the double exposure style for video?
To create the double exposure look using video, Adobe After Effects is your best bet. The same techniques from Photoshop can be applied to After Effects – with even better results!
In a hurry? Check out this beautiful After Effects template for creating a double-exposure video sequence in minutes!